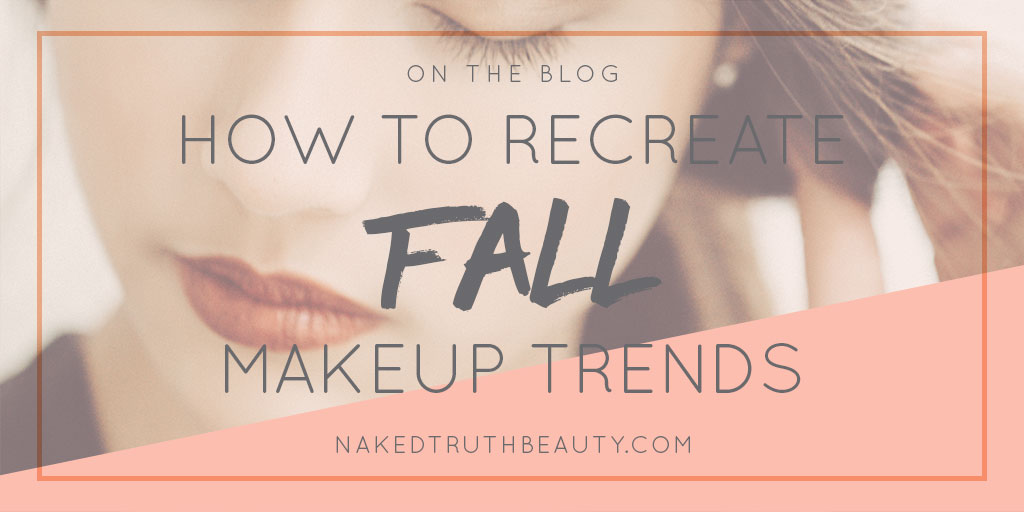
How-to recreate fall makeup trends the healthy way

I was surfing through Refinery29 (as one does) when I came across this article, "The Makeup Looks Our Editors Are Obsessed With For Fall." How could I not flip through that slideshow?
Lo and behold, so many of these looks are straight #NTBReady. While I wanted to do many of these, I limited it to three for "brevity." Ha! Scroll on down to learn how to get these glamorous fall looks the healthy way!
A quick note before we get started: I'm going to assume that you've got your general makeup base down, meaning any foundation, concealer, brow fill, and mascara you usually use. The notes below are how to elevate your regular look. We can do foundation and all that another time!
1. Karlie's Bold Lip
Ahh, Karlie, such a beautiful look! The number one thing I love about this is that it is both glamorous AND easy.
Products needed:
- "Carrie" Lip & Cheek (blood red)
- "Lumos" Beam Highlighter (rose gold glow)
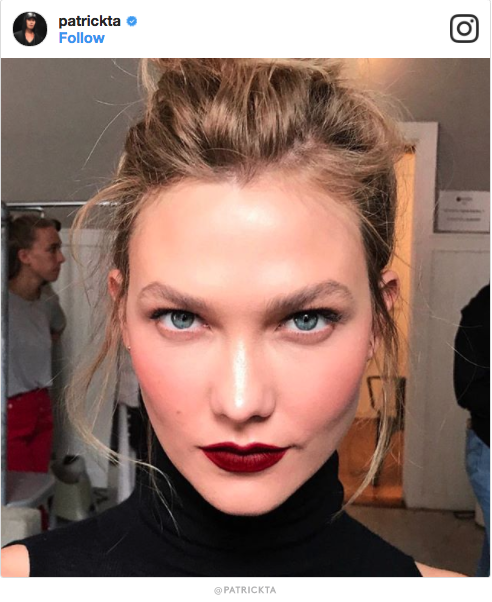
1. Apply Lumos Beam Highlighter down the narrow part of your nose directly from the tube. Blend vertically (as opposed to side to side) with your finger or a brush.
Tip 1: The goal of applying highlighter to the nose is to accentuate its narrowness. To play up length, apply from bridge to tip like Karlie here; to decrease appearance of length, keep the line short and isolated to the bridge. If you're feeling bold, apply a bit of low-light to the sides of the nose, as with a bronzer or an eyeshadow that's slightly darker than your skin like our Lid colors in Little Town or Wookiee. Start small and blend, blend, blend!
Tip 2: Try mixing a little bit of "Lumos" in with your moisturizer or foundation for an all-over glow.
2. Using a lip brush, like this one made of sustainable bamboo and vegan bristles, apply Lip & Cheek in "Carrie" to lips. Saturate brush with pigment and outline lips with color before filling in. Blot lips (as on a tissue), and reapply for heavier pigment and better staying power. To get this look, be sure to use the full application of the lipstick (it also makes for an excellent stain, but that's not the goal here).
3. Sticking with "Carrie," dab a tiny bit of pigment onto the apples of cheeks and blend upward and outward toward the hairline using fingertips. This pigment is a stain, so start small and build! Keep in mind that rubbing your cheeks brings blood to them (the no-make-up-blush technique), so give your skin 20-30 seconds between application to guage the depth of color.
Tip 1: Having trouble finding your apples? Give yourself a smile in the mirror and look for the puffy parts of your cheeks, between nose and cheekbones. They often resemble a soft, inverted triangle.
Tip 2: Keep blush away from your nose if you're prone to nose redness.
4. Comb those brows, sweep on a coat of mascara, put your hair in a messy bun or pony, grab a black turtleneck, and go with your bad self!
2. Barely there, monochrome beauty
This is maybe the easiest look ever. If we ignore the gorgeous warm lighting, what do we see? An effortless and monochrome look that accentuates natural beauty using – you guessed it – only ONE product (yeah, yeah, yeah, I'm ignoring mascara and the aforementioned "basics," but these are optional!). Yes, I'm in love.
Product Needed:
- "As If" Lip & Cheek (mauve-berry-brown – color changes depending on your skin tone!)
1. Grab best-selling lip & cheek stick in "As If" and apply directly to lips. The mouth of the tube seems wide, but you'll be surprised by how much control you have using direct application. Feel free to use your trusty lip brush or your finger, if you prefer that.
Tip: Promise Me, Rose is also a great color for this whole look, particularly if you have very pale skin or prefer a peachier color palette. Please note that Promise Me, Rose may appear "frostier" on darker skin tones.
2. Dab "As If" directly from the tube onto apples of cheeks and and blend upward and outward with your fingers. Build product to desired depth - you want a bit of a rosy glow here, so don't be shy. I don't mean go '80s on it, just make sure it's visible.
Tip: In addition to adding lovely color to your face, blush is a great way to accentuate your cheekbones. Think of your cheekbones as little hills (rolling pins?), and apply blush to the underside and peak of the cheek bones, leaving the top "face" of the hill (just below your eye) naked. This gives the extra effect of a bit of contouring, and helps to bring our the hight of those gorgeous cheekbones of yours!
3. Rub the top of your "As If" stick with your ring finger (the weakest finger, and therefore most gentle on delicate eye area) to get a good amount of product onto the pad of your finger. Using a dabbing motion (rather than a wiping one), build the color from the outer corner of your eye, into the crease, and across the lid. Build to desired depth of color, and wipe off any stray color using a clean finger.
Tip: Apply to naked lids. If you have a favorite primer or setting powder, go for it, but skip the moisturizer or other creams as these can promote slip and creasing. Dab lids with ring finger every so often if you're naturally prone to creasing.
3. The Red Shadow Craze
This look favors the bold, but it's one to try if you're feeling adventurous! And, guess what? The color you need for it is already in your arsenal. Score! Additional fun fact, this look is particularly great for green-eyed beauties because of the fact that red and green are complimentary colors.
Product Needed:
- "Carrie" Lip & Cheek (blood red)
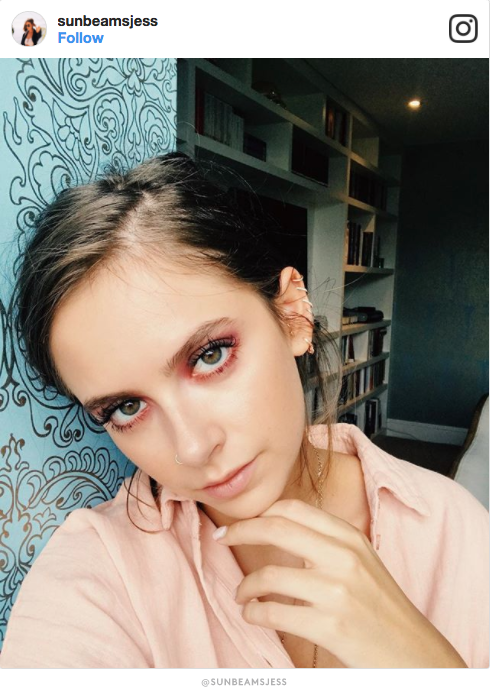
1. You're going to need a couple different eyeshadow brushes for this look. If you don't already have a defining, shading, and blending brush, check out this super affordable kit (sub $6, people!) from Eco Tools, which offers sustainable bamboo handles and vegan fibers.
Tip: This pigment is staining. If you're not sure how much you're picking up on your brush, dab on a tissue to find out. It's always easier to have to go back for more than to try to wipe it off.
2. Gently dab your "defining" brush into your "Carrie" lip & cheek stick to get a tiny bit of product on the brush. Blot off any excess product – you definitely want to start light on this one – and drag color along the lower lash line from the outer edge of the eye to inner corner. Swish the brush back and forth along lash line to smudge the line to achieve a "smoky" look as opposed to a tight line. Keep the color near the lash line (don't smudge too low/far from the eye).
3. Gather a small amount of pigment onto your regular "shade" brush, and blend "Carrie" onto lids starting at the outer corner of the eye. A little bit goes a long way! Start small. Drag product across lower lid and into the crease, and build pigment on the inner portion of the lid, above the inner corner of the eye. When you close your eyes, the color should be concentrated at either edge of the eye, with a wash of color across the center.
4. Use your blending brush and blend, blend, blend to soften the color and overall look.